
Post by tracymae on Jul 11, 2005 9:17:58 GMT 1
Ok so turning a colour photograph to black/white is really simple. Doing it the other way round is far more difficult, but the results can be pretty good even if you are new to this.
This is only the third time I have tried this ever, so bear with me.
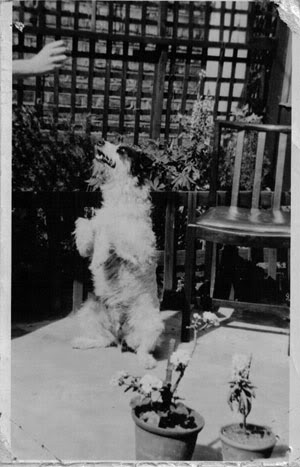
I want to show you how to turn this

to this

The key to most things in photoshop is understanding layers.
Think of layers as being seperate pieces of transparent paper. You start of with your background and if you add a layer on top you can make changes to that layer without affecting the background below it.
The layers pallette looks like this-
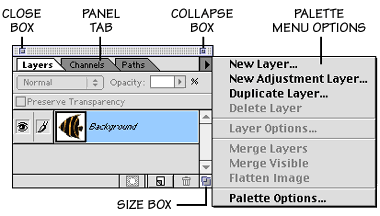
To add a new layer simple click on the new layer icon (looks like a page with the corner turned and is right next to the bin icon). When you add a new layer, you automatically go to that layer and it will be highlighted.
If that all makes sense then lets get started-
Open the original photograph and click Image> Adjustments> Auto levels.
Then choose Image> Adjustments > Desaturate, this will clean the image up and return it to true black/white and remove any yellow discolouring.
Next we want to repair any areas that need it. To repair the crack on the bottom left hand corner use the clone stamp tool.
Press Alt and click on an area close to, but not on, the crack. This selects your cloning source.
Now click over the crack and like magic it will disappear. You might have to Alt click again as you cover it up.
Next we want to remove the hand from the shot. With the trellis in the background, cloning could get very messy, so we will use a different technique to eliminate the hand.
Use the Lasso tool and select an area of trellis to the right of the hand. Right click on the seletion > layer via copy.
This will add a new layer with your selection, use the move tool to position it over the hand and line up with the trellis. Dont worry if it is over the white border as that will get replaced later anyway. If you are happy that the hand is covered and the selection is a good match then click Layer> Merge down.
So you image should now look like this-

Already it looks a lot better.
This is only the third time I have tried this ever, so bear with me.
I want to show you how to turn this
to this
The key to most things in photoshop is understanding layers.
Think of layers as being seperate pieces of transparent paper. You start of with your background and if you add a layer on top you can make changes to that layer without affecting the background below it.
The layers pallette looks like this-
To add a new layer simple click on the new layer icon (looks like a page with the corner turned and is right next to the bin icon). When you add a new layer, you automatically go to that layer and it will be highlighted.
If that all makes sense then lets get started-
Open the original photograph and click Image> Adjustments> Auto levels.
Then choose Image> Adjustments > Desaturate, this will clean the image up and return it to true black/white and remove any yellow discolouring.
Next we want to repair any areas that need it. To repair the crack on the bottom left hand corner use the clone stamp tool.
Press Alt and click on an area close to, but not on, the crack. This selects your cloning source.
Now click over the crack and like magic it will disappear. You might have to Alt click again as you cover it up.
Next we want to remove the hand from the shot. With the trellis in the background, cloning could get very messy, so we will use a different technique to eliminate the hand.
Use the Lasso tool and select an area of trellis to the right of the hand. Right click on the seletion > layer via copy.
This will add a new layer with your selection, use the move tool to position it over the hand and line up with the trellis. Dont worry if it is over the white border as that will get replaced later anyway. If you are happy that the hand is covered and the selection is a good match then click Layer> Merge down.
So you image should now look like this-
Already it looks a lot better.
